Setting Up a Project With Telerik UI for ASP.NET MVC
// This article covers Telerik UI for .NET Framerwork 4.*
This is a step by step guide on how to setup a project from scratch with the Telerik UI for ASP.NET MVC component suite or integrate it to an existing one.
Download & Install
The easiest way to install the framework is by using the Progress Control Panel which is available at your Telerik Account Page.
Log in to the Control Panel with your Telerik account credentials and follow the installation steps for Telerik UI for ASP.NET MVC. After the app has completed downloading the files you can find them in C:\Program Files (x86)\Progress\Telerik UI for ASP.NET MVC <VERSION>\
What’s in the box
- Component Assemblies - Kendo.Mvc.dll
- Exporting API Assemblies
- Kendo UI source files - js, css, fonts, images, etc.
- Visual Studio Extension - Project Templates, Configure and Upgrade Wizards
- Demo Projects
Project Setup
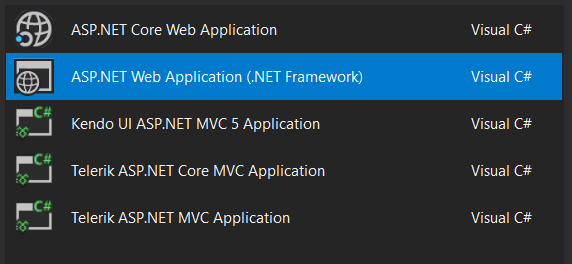
When we open the menu for creating a new web project we see that the Visual Studio Extension has added three project templates:

- Kendo UI ASP.NET MVC 5 Application - MVC 5 project using pure Kendo UI jQuery plugins.
- Telerik ASP.NET MVC Application - MVC 5 project using Razor Html Helper components.
- Telerik ASP.NET Core MVC Application - MVC 6 project based on ASP.NET Core using Razor Tag Helper components.
In this guide we’ll see how to set up our project manually thus having full control over what’s being included and used.
Add Reference to Kendo.Mvc.dll
The file is located in C:\Program Files (x86)\Progress\Telerik UI for ASP.NET MVC <VERSION>\wrappers\aspnetmvc\Binaries\Mvc5
Include the Kendo Namespace globally to the Razor Templates
Add <add namespace="Kendo.Mvc.UI" /> to Views/Web.config
Include Kendo UI to your bundles
Bundling is a feature in ASP.NET 4.5 and above that makes it easy to combine or bundle multiple files into a single file. We can create CSS, JavaScript and other bundles. Fewer files means fewer HTTP requests and that can improve first page load performance. The framework provides an API which allows us to easily manage our front-end assets from a single place. Check out this article for more information about bundling and minification.
First, we should add Kendo UI source files and assets to our project. We do not need everything that is provided in the source folder. As a best practice I’d recommend creating separate folders (named kendo/) inside Scripts/ and Content/ folders in your project.
From /Telerik UI For ASP.NET MVC <VERSION>/js we copy to /Scripts/kendo/
- kendo.all.min.js
- kendo.aspnetmvc.min.js
- jszip.min.js
- cultures/
- messages/
From Telerik UI For ASP.NET MVC <VERSION>/styles we copy to /Content/kendo/:
- images/
- textures/
- fonts/
- <THEME_NAME>/
- kendo.common.min.css
- kendo.<THEME_NAME>.min.css
Kendo UI depends on jQuery so we should rather use the one distributed with the framework instead of the one provided in the MVC template.
Now add the follwing code to App_Start/BundleConfig.cs:
public static void RegisterBundles(BundleCollection bundles)
{
    /* other bundles */

    bundles.Add(new ScriptBundle("~/bundles/kendo").Include(
        "~/Scripts/kendo/jszip.min.js",
        "~/Scripts/kendo/kendo.all.min.js",
        "~/Scripts/kendo/kendo.aspnetmvc.min.js"));

    bundles.Add(new StyleBundle("~/Content/kendo").Include(
        "~/Content/kendo/kendo.common.min.css",
        "~/Content/kendo/kendo.<THEME_NAME>.min.css"));
}
The only thing left is to render these bundles inside our layout file. Keep in mind that Kendo UI’s JavaScript files should be loaded after jQuery. Inside our _Layout.cshtml we add:
@Styles.Render("~/Content/kendo")
@Scripts.Render("~/bundles/kendo")
If we have rendered our script bundles inside the <head> tag we can directly use the components inside our Razor views. On the other hand if we render them before the closing </body> tag we should make sure defer the initialization of our components. More the topic here. Now we’re ready to get started with the Telerik UI components our MVC web app.